First of all I want to discuss about sub domain - In the Domain Name System (DNS) hierarchy, a subdomain is a domain that is part of a main domain.For example if you are making the free blog on blogspot then the URL will look like this after created www.xxx.blogspot.com.This free URL is different to a normal URL and is called a Sub Domain.
This tutorial about if you purchased a domain name from Blogger or Google you can also create a sub domain for the main domain. Just follow the simple given below steps:
For Example - The domain name for this blog is www.blogsdaddy.com and I purchased this domain name directly from blogger.com service.
But now, I added a sub domain to www.blogsdaddy.com , I wanted a Jobs Portal Blog for Government and Private sector jobs so I created this sub domain :
www.jobs.blogsdaddy.com
See Same Format As The Blogspot Domains :
- www.example.blogspot.com
- www.example.blogsdaddy.com
You could even start a whole new blog using a sub domain.
Setting Up A Sub Domain With Blogger Bought Domains
Once you bought your domain you were given a Google Apps account, Do you remember this?
Step 2. On the Google apps home page right top side you will see the log in option:
Enter Your Domain Name -> Go to Domain Management (Select From Drop Down Menu) -> Click On Go Button
Step 3. Enter your username and password - This is the username associated with your Domain.You got a free Email account with your domain name this is the username.
Step 4. Now You Are On Your Google Apps Dashboard Page
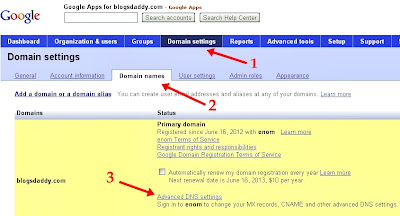
Click "Domain Settings" -> "Domain Names" -> "Advanced DNS Settings" As Shown Below In Screenshot:
Step 5. Your domain is registered with enom.If you want to change advanced DNS settings or update your WHOIS information, you can access enom 's DNS control panel.
Copy the Password and Click "Sign in to DNS console" then sign in your domain management with those details. (Enter domain name and password for login)
See screenshot given below :
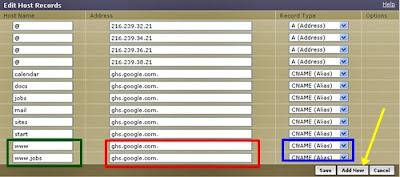
Step 6. Click the "Edit" button for the section "Host Records" as shown below :
Step 7. For this example we are going to add a jobs subdomain - The sub domain will be :
www.jobs.blogsdaddy.com
A - Click "Add New" (Shown By Yellow Arrow) Twice to add two new sections.
B - Enter
jobs and
www.jobs (circled in green below) into the "host name" areas.
C - Enter
ghs.google.com. (circled in red below) in both "address" areas
D - Enter CNAME (Alias) (Circled in blue below) in the "Record Type" areas.
Step 8. After filled all the options in the right place click save in the bottom right.
You have now created a Sub Domain and the next step is to create the blog that is going to use that sub domain.
Creating A Blog And Connecting To Your Sub Domain
If you are creating a sub domain for your blog you have obviously already gone through the process of connecting a domain to blogger.Connecting your sub domain is the very same.
You create your new blog, pick a name, choose the blogspot URL - you will be changing this to your sub domain so its not important.
Once your new blog is set up go to Settings > Publishing > Switch To Advanced Settings > Enter the Sub domain you created into the area provided > Scroll to the bottom of the page and save.
Note - If you do not renew a domain or let a domain expire you will loose the domain and all associated sub domains.
Credits goes to Paul Crowe (spiceupyourblog.com),Because I got idea from his blog.Let us share your experience to create a sub domain.If you find any error or need any type of help then please ask via comments. I love comments of readers and happy to help for my lovely readers.


0 comments:
Post a Comment